


Table of contents
- 1)concat()
- 2)copyWithin()
- 3)entries()
- 4)fill()
- 5)filter()
- 6)find()
- 7)findIndex()
- 8)flat()
- 9)flatMap()
- 10)forEach()
- 11)includes()
- 12)indexOf()
- 13)join()
- 14)keys()
- 15)lastIndexOf()
- 16)map()
- 16)pop()
- 17)push()
- 18)reduce()
- 19)reduceRight()
- 20)reverse()
- 21)shift()
- 22)slice
- 23)some()
- 24)sort()
- 25)splice()
- 26)toString()
- 27)unshift()
- 28)values()
- conclusion
What is Array??🤔
Generally array is data structure used to store same type of data in a single variable. Arrays can hold various types of data, including numbers, strings, objects, or even other arrays. They are commonly used for tasks such as storing lists of items, managing collections of data, and performing operations on sets of values.
But in JavaScript Array is an "Object" not the data structure. Unlike general Array this array can actually store different types of data in single variable. Arrays in JavaScript are dynamic, means they can grow or shrink in size as needed.
Need of Array🧐
Arrays are like the Swiss Army knives of JavaScript - they're essential for keeping all your data organized and easy to manage. Whether you're working with a list of names, numbers, or anything else, arrays provide a convenient way to store and access your information. Plus, with handy methods like forEach and filter, you can effortlessly loop through your array and perform all sorts of cool tricks.
There are variety of methods present in array let's understand them
Types of Array Methos:
1)concat()
The concat() method is used to merge two or more arrays together, creating a new array that contains the elements of the original arrays. It does not modify the existing arrays but instead returns a new array with the combined elements.
This method can accept multiple arrays as arguments, which will be concatenated in the order they are passed. The resulting array will contain all the elements from the original arrays.
General syntax:
let newArray = array1.concat(array2, array3, ..., arrayN);
example:
// concat
let array1 = [1, 2, 3];
let array2 = [4, 5, 6];
let array3 = [7, 8, 9];
const newArray = array1.concat(array2, array3);
console.log(newArray);
output :

The concat() method can also be used to concatenate arrays with other types of values, such as strings or individual elements.
let array1 = [1, 2, 3];
let array2 = ['A', 'B', 'C'];
let newArray = array1.concat('HelloWorld', array2);
console.log(newArray);
output:

In example the string 'HelloWorld' and the elements of array2 are concatenated to array1 resulting in a new array with all the combined elements.
2)copyWithin()
The copyWithin() method is used to copy a sequence of elements within the same array. It overwrites the existing array elements with a shallow copy of themselves.
General syntax:
array.copyWithin(target, start, end)
target: The index at which to start copying elements to.
start : The index at which to start copying elements from (defaults to 0). It is optional
end : The index at which to stop copying elements from defaults to array.length. This is also optional.
example:
let array = [1, 2, 3, 4, 5,6,7,8];
array.copyWithin(3, 0);
console.log(array);
Output:

3)entries()
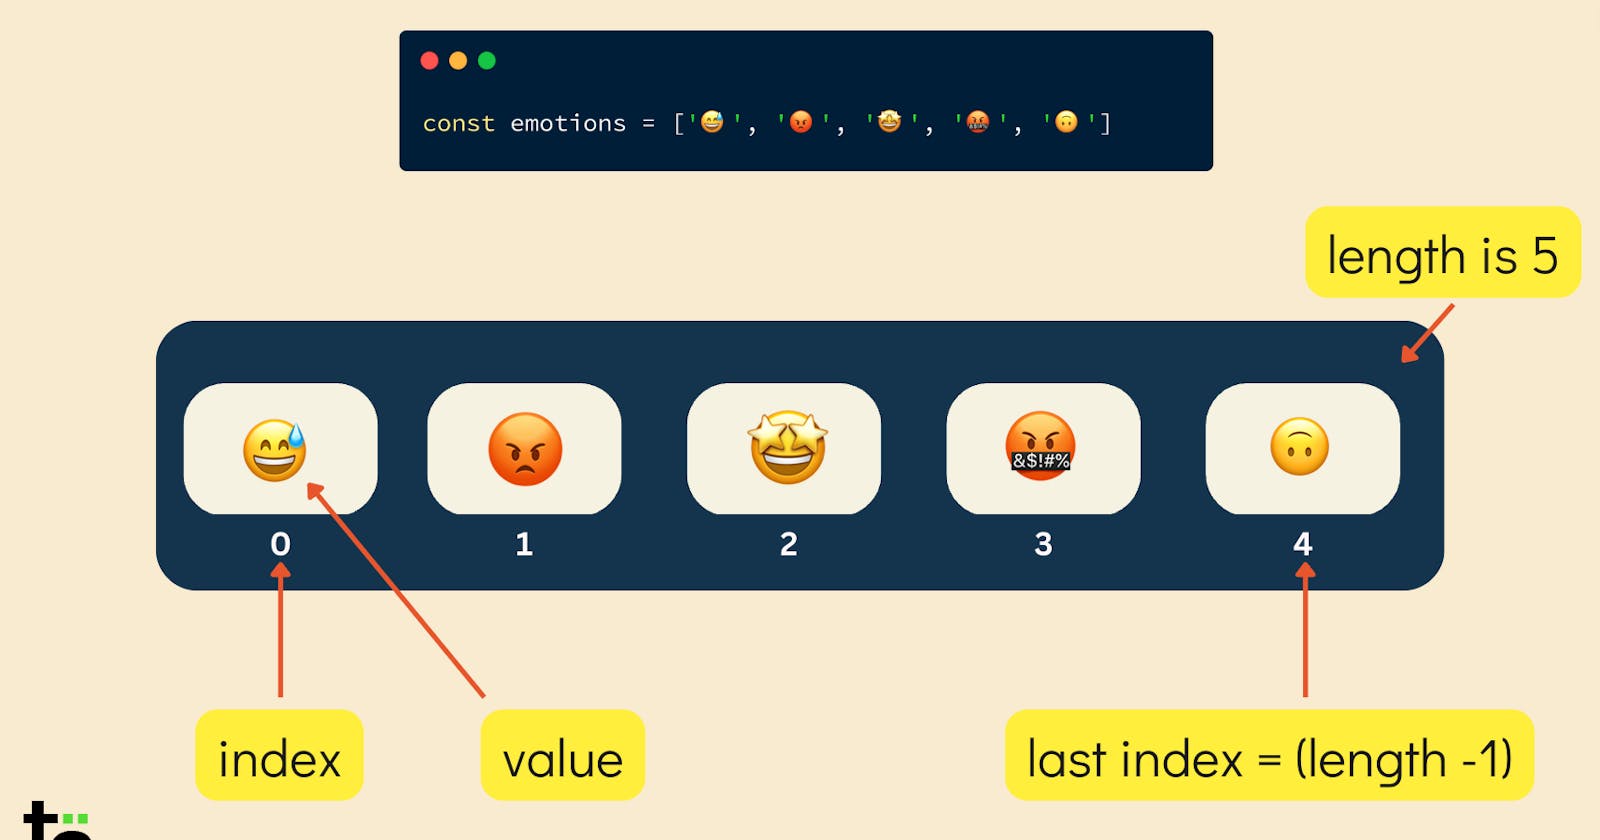
The entries() method is like a tool that helps us look at each piece of information in a list, one by one. It creates a special kind of list, where each item has two parts: a number called an "index" and something else the "value". So or example, if we have a list of names, the entries() method helps us see each name along with its position in the list.
When we use entries() on a list, it gives us a way to go through each item in that list and see its position (index) and what it actually is (the value). This can be handy when we need to work with each item in a list separately, one after the other.
example
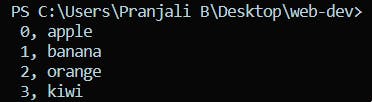
let fruits = ['apple', 'banana', 'orange', 'kiwi'];
let iterator = fruits.entries();
let result = iterator.next();
while (!result.done) {
  console.log(` ${result.value[0]}, ${result.value[1]}`);
  result = iterator.next();
}
4)fill()
The fill() method is used to fill i.e. replace all the elements of an array with a static value. It modifies the original array and returns a reference to the modified array.
General syntax:
array.fill(value, start, end)
example
let array = [1, 2, 3, 4, 5];
array.fill('a', 1, 3);
console.log(array);

5)filter()
The filter() method is like a filter you can use to pick out only the things you want from that list. You tell the filter what kind of things you're interested in by giving it a rule or condition to check for each item in the list.
You could use the filter() method to create a new list that only contains the numbers that are greater than 5. In this case, the condition or rule you give to the filter is "greater than 5". The filter checks each number in the original list, and if it meets the condition, it adds it to the new list.
So, in simple terms, the filter() method helps you make a new list by picking out only the things that match a certain rule or condition from an existing list.
example:
let numbers = [1, 2, 3, 4, 5,6,7,8,9,10];
let greaterThanTwo = numbers.filter((num) => num > 2);
console.log(greaterThanTwo);
output

6)find()
The find() method is like a search tool for arrays. It helps you find the first element in an array that meets a certain condition, defined by a provided function. If it finds an element that satisfies the condition, it returns that element; otherwise, it returns undefined.
how it works: You want to find one specific thing in that list based on a certain rule or condition. The find() method looks through each item in the list and checks if it meets the condition you provided. If it finds an item that meets the condition, it stops searching and gives you that item. If none of the items meet the condition, it tells you it couldn't find anything.
example:
let numbers = [5, 8, 12, 6, 3];
let foundNumber = numbers.find((num) => num > 10);
console.log(foundNumber);
output

And if the element is not present in the array it will undefine
let numbers = [5, 8, 6, 3];
let foundNumber = numbers.find((num) => num > 10);
console.log(foundNumber)
output:

7)findIndex()
The findIndex() method is similar to the find() method, but instead of returning the element itself, it returns the index of the first element in an array that satisfies a given condition. If no element satisfies the condition, it returns -1.
The findIndex() method looks through each item in the list and checks if it meets the condition you provided. If it finds an item that meets the condition, it stops searching and gives you the index of that item. If none of the items meet the condition, it tells you it couldn't find anything and returns -1.
example:
let numbers = [1,2,4,5, 8, 12, 3];
let foundIndex = numbers.findIndex((num) => num > 6);
console.log(foundIndex);
output

8)flat()
The flat() method is used to flatten a nested array structure by collapsing sub-arrays to a specified depth. It creates a new array with all sub-array elements concatenated into it recursively up to the specified depth.
how it works:
Imagine you have an array that contains other arrays, which might contain even more arrays, and so on. This creates a nested structure. The flat() method takes this nested structure and "flattens" it out, meaning it turns it into a single, one-dimensional array.
example:
let nestedArray = [1, 2, [3, 4], [5, [6, 7]]];
let flatArray = nestedArray.flat();
console.log(flatArray);

let nestedArray = [1, 2, [3, 4], [5, [6, 7]]];
// let flatArray = nestedArray.flat();
// console.log(flatArray);
const completelyFlatArray = nestedArray.flat(Infinity);
console.log(completelyFlatArray);

9)flatMap()
The flatMap() method is a combination of two operations: mapping and flattening. It applies a mapping function to each element of the array, and then flattens the result into a new array.
how it works:
It takes an array and applies a mapping function to each element. The mapping function can return either a single value or an array of values. After mapping each element, flatMap() then flattens the result by concatenating all the mapped values into a single, one-dimensional array.
example:
let words = ["apple,banana", "orange", "grape,kiwi"];
let splitWords = words.flatMap((word) => word.split(","));
console.log(splitWords);

10)forEach()
The forEach() method is like a tour guide for arrays. It allows you to go through each item in an array and do something with it, one by one
how it works:
Imagine you have a list of things, like names or numbers, and you want to do something with each item in that list. The forEach() method helps you do just that. It takes a function as input, and then it goes through each item in the array and applies that function to it.
let names = ["Pranjali", "Rani", "Gourav", "Sagar"];

 names.forEach((name) => {

console.log(`Hello, ${name}!`);
});

11)includes()
In JavaScript, you can use the includes() method on arrays to search for a specific value. If the value is found in the array, includes() returns true; otherwise, it returns false.
Example
 let ingredients = ["sugar", "butter", "flour", "eggs"];

let includesFlour = ingredients.includes("flour");

console.log(includesFlour);
output

let ingredients = ["sugar", "butter", "eggs"];

let includesFlour = ingredients.includes("flour");

console.log(includesFlour);

12)indexOf()
The indexOf(a) method is incredibly handy when you need to search for a specific value within an array. It's like having a built-in detective that helps you locate where an item is positioned in a list.
When you use indexOf() on an array, you're essentially instructing JavaScript to scan through each element in the array, one by one, looking for a particular value. It starts its search from the beginning of the array and progresses towards the end.
Once the indexOf() method finds the value you're searching for, it excitedly reports back the index (position) where the value is located within the array. This index is essentially the numeric address of the value within the array, with counting starting from 0 for the first element.
However, if the value you're searching for isn't present in the array, the indexOf() method doesn't give up. It diligently searches through every element but eventually comes to the conclusion that the value isn't there. In this case, it returns -1, signaling that the value couldn't be found in the array.
example
let numbers = [12,10,15,14,16,18,19]
let result = numbers.indexOf(14);
console.log(result);

let numbers = [12,10,15,16,18,19]
let result = numbers.indexOf(14); c
onsole.log(result);

13)join()
The join() method is used to concatenate all the elements of an array into a single string. It combines the elements with a specified delimiter, which separates each element in the resulting string. This allows for easy creation of formatted strings or CSV (Comma-Separated Values) representations from array data.
example
let mixedArray = ["apple", 10, true, { name: "Ram", age: 30 }];

let result = mixedArray.join(", ");

console.log(result);

Now the question is why its giving (Object,object) not the string the reason is
The fourth element of the mixedArray is an object { name: "Ram", age: 30 }. When this object is converted to a string (as required by the join() method), JavaScript implicitly calls its toString() method. Since the default toString() method of objects returns "[object Object]", that's why you see [object Object] in the resulting string.
14)keys()
The keys() method is used to extract the keys of an object and return them as an array. It provides a convenient way to access the keys of an object for further processing or iteration.
When you use keys() on an object, it looks at all the properties of that object and writes down their names in a list, or an array to be precise. Each name in the list represents a property of the object.
let person = {
  name: "Sham",
  age: 30,
  city: "Nagpur"
};

let keysArray = Object.keys(person);
console.log(keysArray);

15)lastIndexOf()
The lastIndexOf() method is like a reverse detective. It helps you find the last occurrence of a specified value within an array, starting from the end and moving towards the beginning.
How its works:
Searching from the End: While indexOf() starts searching from the beginning of the array, lastIndexOf() begins its search from the end of the array. Finding the Last Occurrence: It searches through the array backwards, looking for the last occurrence of the specified value. Returning the Index: If it finds the value, lastIndexOf() tells you the index (position) where the last occurrence is located. If it doesn't find the value, it returns -1.
example
let numbers = [1, 2, 3, 4, 2, 5, 2];

let lastIndex = numbers.lastIndexOf(2);

console.log(lastIndex);

16)map()
The map() method in JavaScript is an incredibly versatile tool for working with arrays. At its core, map() allows you to transform each element of an array according to a specified function. You provide this function, known as a callback function, which defines how each element should be modified or processed. As map() iterates through the array, it applies the callback function to each element one by one, creating a new array with the transformed elements.
One of the key advantages of map() is that it creates a brand new array with the transformed elements, leaving the original array untouched. This means you can safely apply transformations to the elements without modifying the original data. Once all elements have been processed, map() returns the new array, containing the transformed elements, ready for further use in your code. This makes map() particularly useful for tasks such as formatting data, performing calculations, or applying any kind of transformation logic to array elements. Its simplicity and flexibility make it a fundamental method in JavaScript for array manipulation and data transformation tasks.
example
let numbers = [1, 2, 3, 4, 5];
let doubledNumbers = numbers.map((number) => {
  return number * 2;
});
console.log(doubledNumbers);

16)pop()
The pop() method is like removing the last item from a stack of plates. It allows you to remove the last element from the end of an array and returns that element.
how it works:
Removing the Last Element: When you use pop(), it removes the last element from the end of the array, effectively reducing the length of the array by one. Returning the Removed Element: After removing the last element, pop() returns the removed element. This allows you to capture and use the removed element in your code if needed. Mutating the Original Array: pop() directly modifies the original array by removing the last element from it. This means the array is altered in place, and you don't need to create a new array.
example
let fruits = ["apple", "banana", "orange"];

let removedFruit = fruits.pop();

console.log(removedFruit);

console.log(fruits);
17)push()
The push() method in JavaScript is like adding a new item to the end of a line. It allows you to add one or more elements to the end of an array, effectively increasing the array's length.
how it works:
Adding Elements to the End: When you use push(), you can specify one or more elements that you want to add to the end of the array. These elements are appended to the existing elements in the array.
Increasing the Array Length: As push() adds elements to the end of the array, it automatically increases the length of the array to accommodate the new elements.
Mutating the Original Array: push() directly modifies the original array by adding new elements to the end of it. This means the array is altered in place, and you don't need to create a new array.
example
let colors = ["red", "green", "blue"];

colors.push("yellow");

console.log(colors);

18)reduce()
It is a powerful tool for performing cumulative operations on array elements, allowing you to compute a single value based on the entire array. It's commonly used for tasks such as calculating sums, finding maximum or minimum values, or aggregating data in complex ways.
It allows you to perform a cumulative operation on all elements of an array and ultimately reduce them to a single value.
example
let words = ["Hello", " ", "World", "!"];
let concatenated = words.reduce((accumulator, currentValue) => {
  return accumulator + currentValue;
}, "");
console.log(concatenated);

19)reduceRight()
The reduceRight() method is similar to the reduce() method, but it starts processing the array from the end (from the last element to the first), rather than from the beginning.
reduceRight() is useful when you need to perform a cumulative operation on array elements starting from the end of the array. It's commonly used for tasks such as building strings in reverse order or processing data in reverse sequence.
example
let words = ["apple", "banana", "orange"];

const concatenatedReverse = words.reduceRight((accumulator, currentValue) => {
  return accumulator + " " + currentValue;
}, "");

console.log(concatenatedReverse);

20)reverse()
reverse() is a convenient method for changing the order of elements in an array, effectively flipping it backwards. It's commonly used in scenarios where you need to process array elements in reverse order or display data in a different sequence.
It provides a simple and efficient way to flip the order of elements in an array, opening up possibilities for various applications such as data manipulation, user interface design, and text processing. Its versatility makes it a valuable tool in JavaScript for working with arrays and strings.
example
let numbers = [1, 2, 3, 4, 5];

numbers.reverse();

console.log(numbers);
21)shift()
The shift() method in JavaScript is like removing the first item from a line. It allows you to remove the first element from the beginning of an array and returns that element.
how it works:
Removing the First Element: When you use shift(), it removes the first element from the beginning of the array, effectively reducing the length of the array by one.
Returning the Removed Element: After removing the first element, shift() returns the removed element. This allows you to capture and use the removed element in your code if needed.
Mutating the Original Array: shift() directly modifies the original array by removing the first element from it. This means the array is altered in place, and you don't need to create a new array.
example
let fruits = ["apple", "banana", "orange"];

let removedFruit = fruits.shift();

console.log(removedFruit);

22)slice
slice() is a versatile method for extracting portions of an array, allowing you to work with specific subsets of data without modifying the original array. It's commonly used in scenarios where you need to manipulate or process only a part of an array.\
example
let fruits = ["apple", "banana", "orange", "kiwi", "mango"];

let selectedFruits = fruits.slice(1, 4);

console.log(selectedFruits);
console.log(fruits);

23)some()
some() is a handy method for quickly determining whether at least one element in an array meets a specific condition. It's commonly used in scenarios such as data validation, filtering, or checking for specific values in an array.
example
let numbers = [5, 8, 12, 7, 3];

let hasGreaterThanTen = numbers.some((number) => {
  return number > 10;
});

console.log(hasGreaterThanTen);

24)sort()
The sort() method is like arranging a list of items in alphabetical or numerical order. It allows you to sort the elements of an array in place and returns the sorted array.
sort() is a versatile method for arranging the elements of an array in a specified order, allowing you to quickly organize data for various purposes. It's commonly used in scenarios such as sorting lists of names, numbers, or objects based on specific criteria.
example
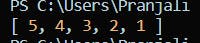
let numbers = [3, 1, 5, 2, 4];
let alpha = ['d', 'c' , 'b' , 'a' ]

numbers.sort();

console.log(numbers);

alpha.sort()

console.log(alpha);

25)splice()
The splice() method in JavaScript is like editing a document by cutting out a section and replacing it with new content. It allows you to modify the contents of an array by removing or replacing existing elements and optionally inserting new elements in their place. splice() is a versatile method for modifying the contents of an array, allowing you to remove elements, insert new elements, or replace existing elements all in one operation. It's commonly used in scenarios such as data manipulation, list editing, and dynamic content updates.
example
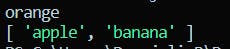
let fruits = ["apple", "banana", "cherry", "date"];

let removedItems = fruits.splice(1, 2, "orange", "grape");

console.log(fruits);
console.log(removedItems);

26)toString()
The toString() method in JavaScript is like converting an array into a string representation. It converts each element of an array into a string and joins them together into a single string, separated by commas.
toString() provides a simple way to convert an array into a string, which can be useful for logging, displaying, or transmitting array data as text. It's important to note that toString() does not modify the original array; it only returns a string representation of its elements.
example
let numbers = [1, 2, 3, 4, 5];

let numbersString = numbers.toString();

console.log(numbersString);

27)unshift()
The unshift() method in JavaScript is like adding new guests to the front of a line. It allows you to add one or more elements to the beginning of an array, effectively increasing the array's length and shifting existing elements to higher indices. It's commonly used in scenarios where you want to prepend elements to an array or maintain a dynamic list of data.
example
let fruits = ["banana", "orange", "apple"];

fruits.unshift("pear", "grape");

console.log(fruits);

28)values()
The values() method in JavaScript is used to create an iterator object that contains the values of an array. This iterator allows you to iterate over the values of the array using a loop or other iterable methods.
values() provides a way to iterate over the values of an array using an iterator, allowing for easy access to each value individually. It's particularly useful when you need to perform operations on each value of the array in sequence or when you want to integrate array values into other iterable data structures or algorithms.
Example
ers = [1, 2, 3, 4, 5];
const iterator = numbers.values();

for (const value of iterator) {
  console.log(value);
}

conclusion
To wrap it up, getting the hang of array methods in JavaScript is super important for handling data like a pro. Whether you're just looping through stuff, or doing fancier things like transforming data or finding specific items, these methods are your go-to tools. By mastering these methods, you'll be writing cleaner, snappier code that's easier to maintain and debug, making your JavaScript apps shine bright.
Thank you for joining me on this journey through array methods in JavaScript. I hope you gained valuable insights into how these methods can streamline your code and enhance your development workflow. Keep exploring and experimenting with JavaScript arrays to unlock even more possibilities in your projects.
until next time
cheers!!!!!!!